Claush User Manual
From server setup to chat operations and AI character configuration. A step-by-step guide to every feature in Claush.
Getting Started
Claush is an app that lets you control Claude Code — the world's most advanced AI coding agent — from your iPhone. Simply chat with the AI using a messaging-style interface, and handle everything from coding to deployment right on your phone.
Requirements
| Requirement | Description |
|---|---|
| Linux VPS | A server accessible via SSH. Any provider works: AWS, GCP, Vultr, DigitalOcean, etc. Ubuntu 22.04 or later recommended. |
| Claude Code License | An Anthropic API key or a Claude Max/Pro/Teams subscription. |
| SSH Key Pair | Ed25519 recommended. Place the public key on your server and register the private key in the app. |
How to Create SSH Keys
If you don't have SSH keys yet, run the following commands in your PC's terminal to create them.
Generate a Key Pair
ssh-keygen -t ed25519 -C "your-email@example.com"When prompted for a save location, press Enter to use the default (~/.ssh/id_ed25519). You can optionally set a passphrase.
Register the Public Key on Your Server
ssh-copy-id -i ~/.ssh/id_ed25519.pub username@server-ip-addressEnter your server's password and the public key will be automatically registered. Some VPS providers also let you register public keys through their control panel (web management console). In that case, register the output of cat ~/.ssh/id_ed25519.pub.
Copy the Private Key
cat ~/.ssh/id_ed25519Copy everything from -----BEGIN OPENSSH PRIVATE KEY----- to -----END OPENSSH PRIVATE KEY----- and paste it into the private key field on the Claush server setup screen.
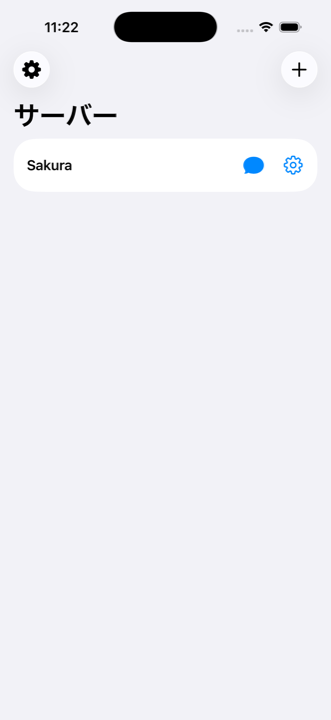
Server List
When you open the app, the server list screen is displayed. Each server has two buttons.
| Button | Icon | Function |
|---|---|---|
| Chat | 💬 | Connect to the server and open the chat screen |
| Settings | ⚙️ | Open the server settings screen |
The gear icon (⚙️) in the top left opens the app-wide settings screen. The button in the top right lets you add a server.
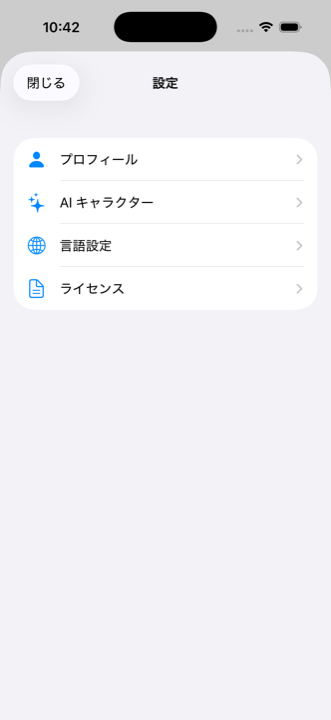
Settings
Tap the ⚙️ gear icon in the top left of the server list to open the settings screen. Settings are organized as a hub with four categories.
| Category | Contents |
|---|---|
| Profile | Name, nickname, age, gender, programming experience |
| AI Character | AI image generation API key settings, character list, shop |
| Language | Display language selection |
| Licenses | License information for libraries used |
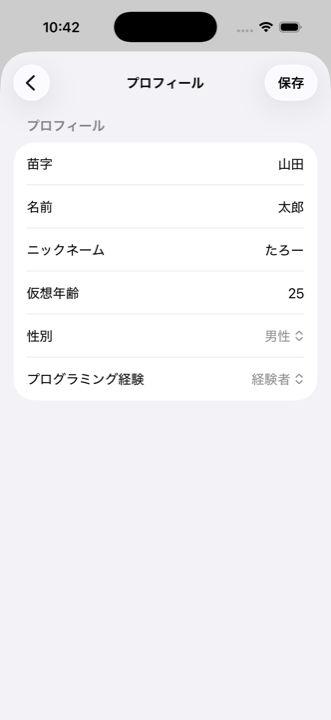
Profile
Go to Settings > Profile to configure the following information. AI responses will be tailored based on your profile.
- Name (last name, first name)
- Nickname
- Virtual Age
- Gender
- Programming Experience: Selecting "No experience" will make the AI avoid technical jargon and provide more gentle guidance
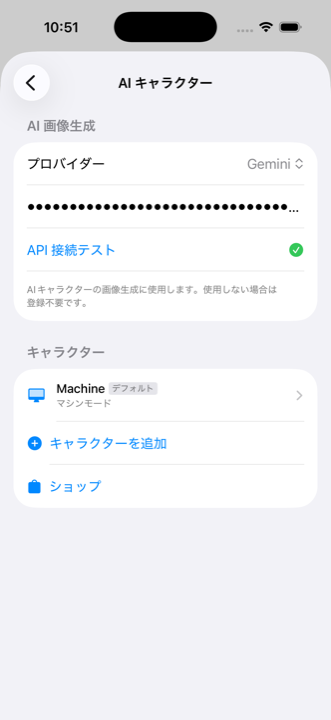
AI Image Generation
Go to Settings > AI Character > "AI Image Generation" section to register an API key for automatic character image generation.
| Provider | Model |
|---|---|
| OpenAI | gpt-image-1 |
| Gemini | gemini-2.5-flash-image |
Once an API key is registered and tested successfully, you can switch between "Select Image" and "Generate with AI" on the character creation screen. Choosing "Generate with AI" displays appearance settings (gender, skin, body type, age, hair color, hairstyle) and a preview generation button.
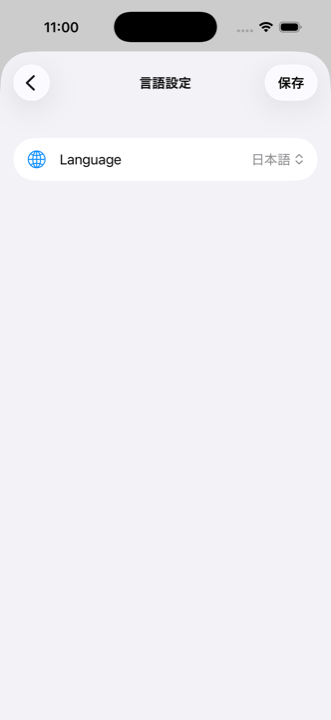
Language Settings
Go to Settings > Language to change the display language. The following 10 languages are supported.
- Japanese, English, Chinese, Korean, Spanish
- French, German, Portuguese, Italian, Arabic
Switching the language is immediately reflected across the entire UI. You can give instructions to the AI in any language.
AI Characters
In Claush, you can give the AI a name, speech style, and personality to create "your own personal companion." Characters remember conversations and naturally adjust their emotional distance based on affinity level.
| Item | Details |
|---|---|
| Number of Characters | Up to 5 characters can be created |
| Server Relationship | One character is assigned per server |
| Modifications | Cannot be changed after creation. Create a new one to make changes |
| Default | "Machine" character is preset. No nurturing features |
Creating a Character
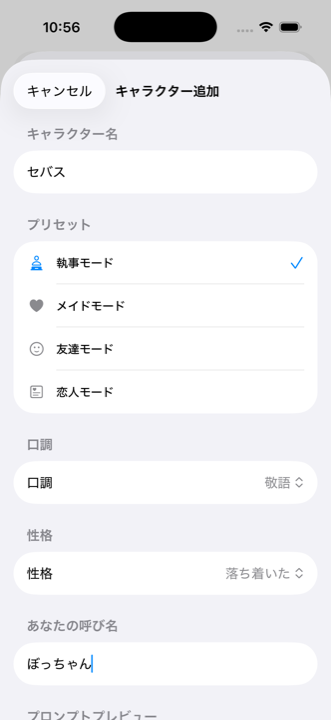
Go to Settings > AI Character > "Add Character" to open the creation screen.
Enter a Name
Enter any name for the character. Examples: Sebastian, Miku
Select a Preset
Choose a base type: Butler / Maid / Friend / Partner. Selecting one automatically configures speech style, personality, and how they address you.
Customize Speech Style & Personality
Speech Style: Polite / Formal / Casual / Refined / Cool / Alluring
Personality: Cheerful / Calm / Reserved
Your Nickname: How the character addresses you (e.g., "Master," "Boss")
Set an Image (Optional)
Use "Select Image" to upload manually, or if an AI image generation API key is configured, switch to "Generate with AI." In AI generation mode, you can set appearance details (gender, skin, body type, age, hair color, hairstyle) and generate a preview.
Create
Tap the "Create" button to finish. You can assign this character to a server from the Claude section in server settings.
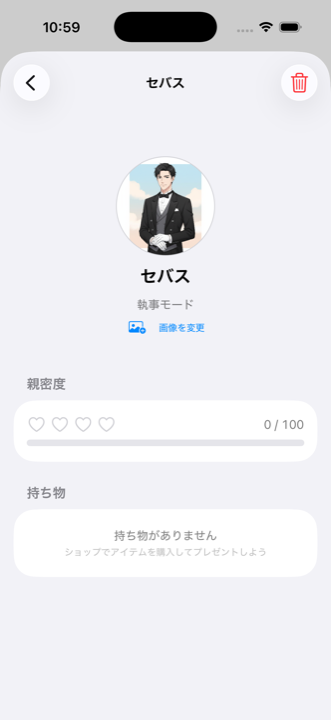
Character Details
Go to Settings > AI Character > tap a character's name to open the detail screen.
Displayed Information
- Character Image (manually uploaded / default icon. Can be changed via "Change Image")
- Name and Type
- Affinity: 4 hearts (♡♡♡♡ to ❤️❤️❤️❤️) + score (0-100)
- Inventory: Items owned and a "Give" button
Giving Gifts
Select an item from the inventory and tap "Give" to present it to the character. Giving gifts increases affinity.
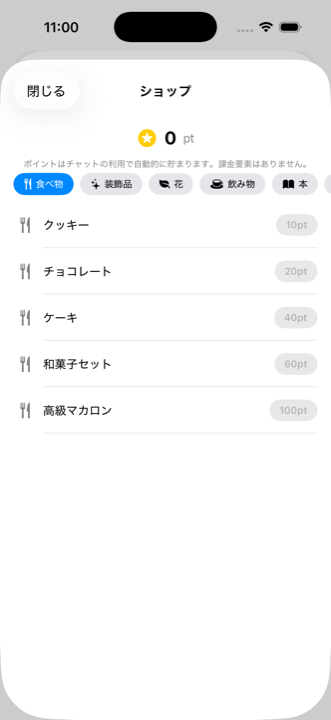
Shop
Go to Settings > AI Character > "Shop" to open the item purchase screen.
Points
You earn 1 point for each chat message sent. Points are a shared currency across all characters. There are no in-app purchases.
Items
There are 30 items in total across 6 categories (5 per category). Prices range from 10 to 100 points.
| Category | Example Items | Price Range |
|---|---|---|
| 🍴 Food | Cookies, Chocolate, Cake ... | 10-100 pts |
| ✨ Accessories | Ribbon, Bracelet, Necklace ... | 10-100 pts |
| 🌿 Flowers | Tulip, Lily, Rose Bouquet ... | 10-100 pts |
| ☕ Drinks | Juice, Coffee, Wine ... | 10-100 pts |
| 📖 Books | Paperback, Manga, Art Book ... | 10-100 pts |
| 🎁 Sundries | Candle, Music Box, Fountain Pen ... | 10-100 pts |
Affinity System
Giving items to a character increases their affinity. As affinity grows, the emotional distance in Claude's responses naturally changes.
| Affinity | Hearts | Emotional Distance |
|---|---|---|
| 0-24 | ♡♡♡♡ | First meeting. Reserved and business-like responses |
| 25-49 | ❤️♡♡♡ | Acquaintance. Polite but slightly warmer |
| 50-74 | ❤️❤️♡♡ | Becoming friends. Shares their own opinions |
| 75-99 | ❤️❤️❤️♡ | Close friend. Cracks jokes and shows concern |
| 100 | ❤️❤️❤️❤️ | Deepest bond. Natural and intimate relationship |
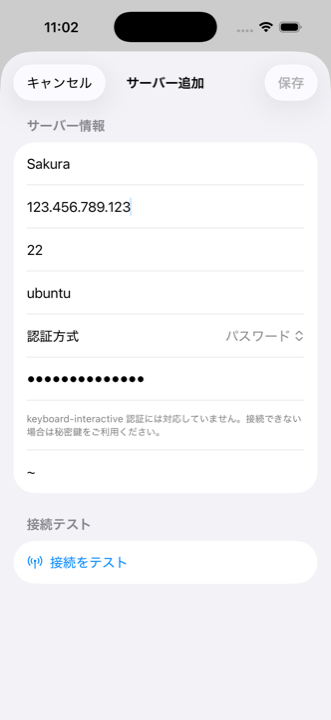
Adding a Server
Tap the button in the top right of the server list screen to add a server.
Enter Server Information
Enter the server name, host (IP address), port (usually 22), and username.
Select Authentication Method
Private Key (Recommended): Paste a PEM-format private key. If it has a passphrase, enter it as well.
Password: Enter your password. However, keyboard-interactive authentication is not supported, so key-based authentication is recommended.
Run Connection Test
Tap the "Test Connection" button. A checkmark appears on success, and the save button becomes active.
Save
Tap "Save" in the top right to finish.
--dangerously-skip-permissions cannot be used with root. Follow the steps below to create a dedicated user.
Creating a Dedicated User
SSH into your server as root from your PC's terminal and run the following commands. (Perform this on your PC, not through Claush.)
Create a User
adduser claudeSet a password. Other information (Full Name, etc.) can be skipped by pressing Enter.
Grant sudo Privileges
usermod -aG sudo claudeRequired for Claude Code to install packages and perform system operations.
Set Up SSH Keys
mkdir -p /home/claude/.ssh
cp ~/.ssh/authorized_keys /home/claude/.ssh/
chown -R claude:claude /home/claude/.ssh
chmod 700 /home/claude/.ssh
chmod 600 /home/claude/.ssh/authorized_keys
Copy root's public keys or register a new key pair.
Configure Passwordless sudo (Recommended)
echo 'claude ALL=(ALL) NOPASSWD:ALL' > /etc/sudoers.d/claudeIf Claude Code is prompted for a password when using sudo, operations will stall. This configuration is recommended.
Once complete, specify claude (the created username) as the username on the Claush server setup screen.
Server Settings
Tap the ⚙️ button on the server list to open the settings screen. It consists of 4 accordion sections.
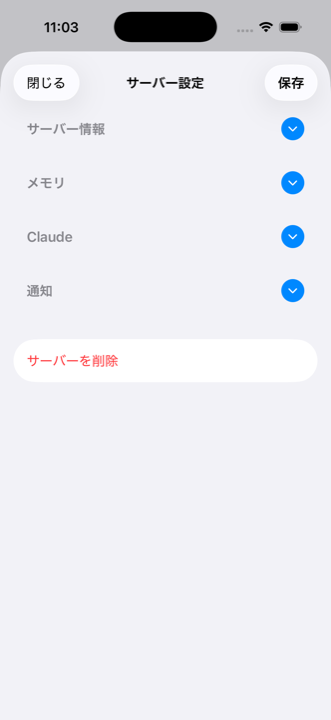
| Section | Contents |
|---|---|
| Server Info | Basic settings including host, port, username, and authentication method |
| Memory | Database configuration for conversation memory |
| Claude | Model selection, AI character assignment |
| Notifications | Webhook configuration for Slack/Discord/Teams notifications |
Tap the round button on the right side of each section to expand or collapse it. After making changes, tap "Save" in the top right to apply.
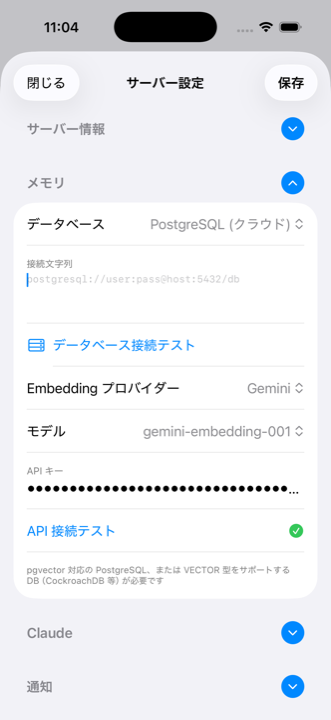
Memory Settings
The memory feature lets the AI remember conversation content across sessions. It enables requests like "continue where we left off yesterday."
Database Types
| Type | Features | Recommended For |
|---|---|---|
| None | Memory feature disabled | - |
| SQLite | Stored in a file on the server. No additional setup required. | Quick and easy start |
| PostgreSQL | Stored in an external database. Supports embedding search. | High-precision context retrieval |
Setup Steps
Select a Database Type
Go to Server Settings > expand the Memory section > select the database type. For PostgreSQL, also enter the connection string.
Embedding Settings (PostgreSQL Only, Optional)
Select an embedding provider (OpenAI / Gemini) and enter an API key to enable vector search. You can also select the model.
Save for Automatic Setup
Tapping "Save" automatically executes: SSH connection > dependency installation > MCP server deployment > Claude configuration > connection test. Progress for each step is displayed in real time.
Claude Settings
Model Selection
Select the Claude model to use. Each model differs in performance, speed, and cost. The currently selected model is indicated with a checkmark.
Sensitive File Access
Use the toggle to control AI access to sensitive files such as .env. The default is OFF (access denied).
AI Character Assignment
If custom characters have been created, you can select which character to assign to this server. Once assigned, Claude will respond in that character's speech style and personality.
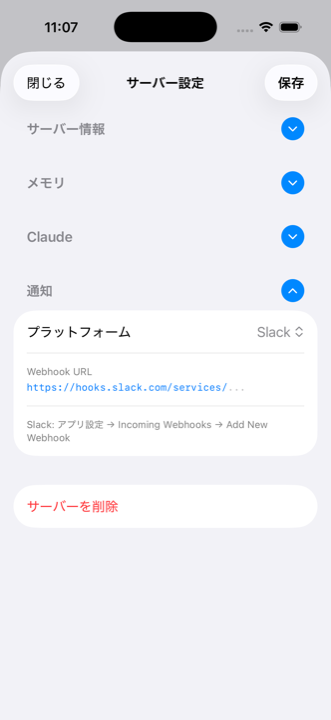
Notification Settings
Get notified when Claude finishes responding via external services. This lets you switch to other tasks while long-running operations are in progress.
Supported Platforms
You need to obtain a Webhook URL from each service beforehand.
| Platform | How to Get the Webhook URL (set up on each service) |
|---|---|
| Slack | Slack App Settings > Incoming Webhooks > Add New Webhook to get the URL |
| Discord | Discord Server Settings > Integrations > Webhooks > New Webhook to get the URL |
| Microsoft Teams | Teams Channel > Connectors > Incoming Webhook to get the URL |
Select a Platform
Choose from Slack / Discord / Microsoft Teams.
Enter the Webhook URL
Paste the Webhook URL issued by the selected platform.
Save
Tapping "Save" automatically deploys the notification server and sends a test notification.
Session Basics
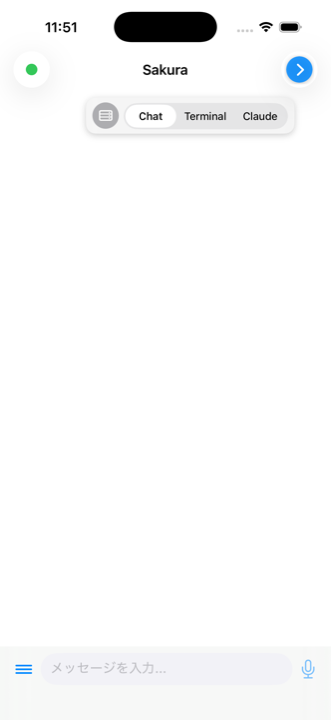
Tapping the chat button connects to the server and opens a screen with three tabs.
Three-Tab Layout
| Tab | Description |
|---|---|
| Chat | Displays Claude's responses as chat bubbles. This is the tab you'll normally use. |
| Terminal | A raw shell. Useful for checking files and running commands. |
| Claude | The raw Claude Code TUI screen. View details of tool execution in progress. |
Switching Tabs
Tap the button in the top right to expand the tab picker. Select Chat / Terminal / Claude to switch tabs.
Tap the server icon to the left of the tabs to return to the server list. The tmux session on the server continues running in the background, so you can resume your work by reconnecting.
Connection Status
Check the connection state via the indicator in the top left.
| Display | Status |
|---|---|
| 🟢 Green dot | Connected. Claude is ready for input |
| ⏳ + "Setting up" | Installing dependencies |
| ⏳ + "Claude" | Starting Claude Code |
| ⏳ + "tmux" | Connecting to tmux session |
| ⏳ + "Reconnecting" (orange) | Connection lost, reconnecting |
| ⚪ Gray dot | Disconnected |
| ❌ Red mark | Error |
Chat Tab
This is the main screen of Claush. Send a message and Claude Code responds, displayed as chat bubbles.
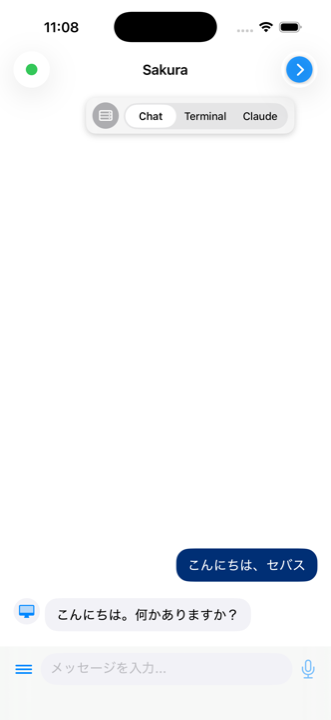
Sending Messages
Enter a message in the input field at the bottom of the screen and tap the send button on the right. An animated indicator appears while Claude is processing.
Message Display
- User Messages: Right-aligned blue bubbles
- Claude's Responses: Left-aligned gray bubbles (with avatar when an AI character is set)
- Markdown Support: Code blocks include syntax highlighting and copy buttons
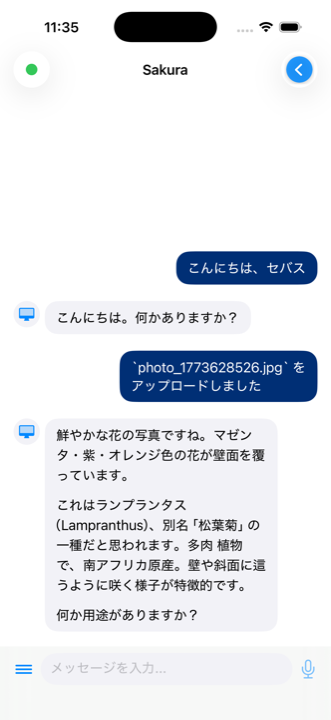
Attachment Menu
Tap the menu button on the left of the input field to display the following options.
| Option | Function |
|---|---|
| Select File | Upload a file from your device |
| Select Photo | Upload an image from the photo library |
| Download File | Download a file from the server |
| Clear Chat Log | Delete all chat history |
Past Messages
Scroll to the top of the chat and a "Load earlier messages" button appears. Tapping it loads past messages in batches of 30.
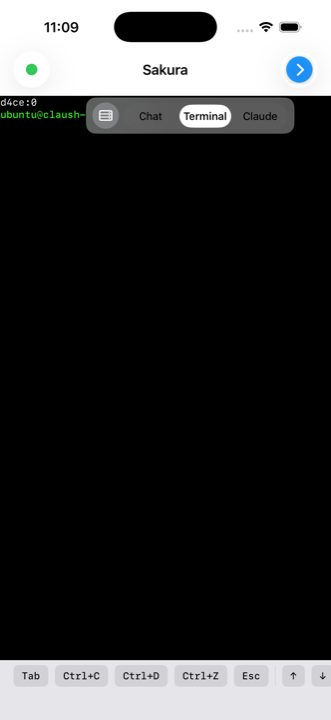
Terminal Tab
A full terminal emulator providing raw shell access. Use it for checking files, Git operations, running commands, and more.
Special Key Bar
Control characters that are difficult to type on the standard iOS keyboard can be entered with a single tap from the key bar at the bottom of the screen.
| Key | Purpose |
|---|---|
| Tab | Command completion |
| Ctrl+C | Interrupt the running command |
| Ctrl+D | End of input (EOF) |
| Ctrl+Z | Suspend the process |
| Esc | Mode switching in vim, etc. |
| ↑ ↓ ← → | Cursor movement / command history |
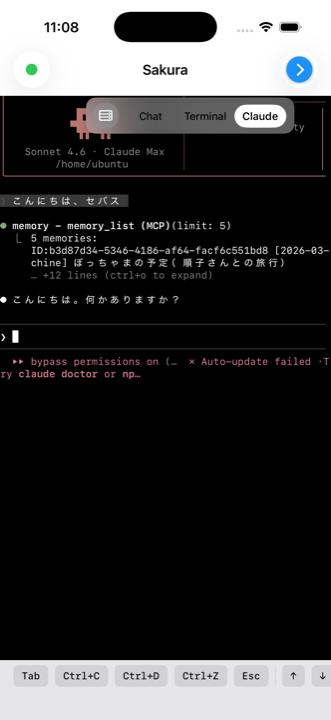
Claude Tab
Displays the Claude Code TUI (Text User Interface) as-is. You can see tool execution details and thinking processes in real time that are omitted in the Chat tab.
You can also type directly in the Claude tab, so you can manually run Claude Code slash commands (/clear, /cost, etc.).
File Transfer
Upload
From the chat attachment menu, tap "Select File" or "Select Photo" to choose a file. The file is uploaded to ~/claush-uploads/ on the server, and Claude is notified accordingly.
Select a File from the Menu
Attachment menu > "Select File" or "Select Photo"
Upload Complete
An indicator is displayed during upload. Once complete, a notification message is sent in the chat.
Give Instructions to Claude
Tell Claude something like "Create a UI based on the uploaded image" and it will reference the file to work.

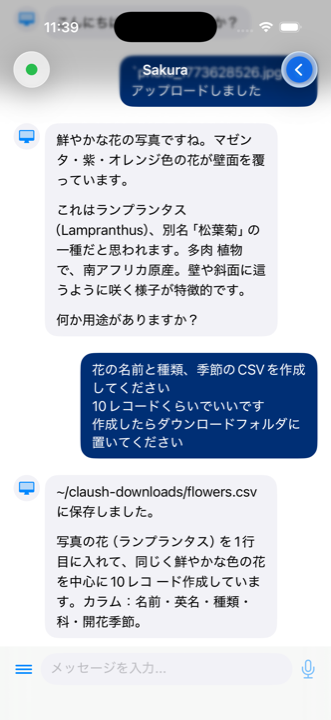
Download
Tap "Download File" in the attachment menu to see a list of files in the server's ~/claush-downloads/ directory. Tap a file to download it to your iPhone, and a share sheet will appear.

Tips & Tricks
Break Work into Small Pieces
Keep each instruction to a single user story. This makes it easier to review on a phone screen. You can verify at the PR level, maintaining quality while developing at a good pace.
Check Progress in the Claude Tab
During long-running tasks, switch to the Claude tab to see what's happening in real time. Switch back to the Chat tab to see the results as chat bubbles.
Use Notifications for Async Work
With notifications configured, Claude's response completions arrive on Slack or Discord. This enables an asynchronous development style: send an instruction, close the app, and do something else.
Carry Context Forward with Memory
With the memory feature enabled, the AI remembers the contents of previous sessions. You can enjoy a natural development experience with requests like "continue from yesterday" or "that thing we discussed before."
Work Continues in the Background
Thanks to tmux session management, server-side work continues even after you close the app. The results are automatically retrieved the next time you open the app.
Troubleshooting
Cannot Connect
- Verify that the host, port, and username are correct
- Make sure the private key is copied exactly from
-----BEGIN OPENSSH PRIVATE KEY-----to-----END OPENSSH PRIVATE KEY-----, including line breaks - Root user connections are not supported. Create a dedicated user
- Keyboard-interactive authentication is not supported. Use key-based authentication
Claude Code Won't Start
- Verify that
claude loginhas been completed on the server. You can run this from the Terminal tab - Verify that the user has sudo privileges (without password). This is required for automatic installation
No Response
- Switch to the Claude tab to check the Claude Code TUI status
- If the connection status in the top left shows "Reconnecting," check your network connection
- If there's still no response after a long time, check directly from the Claude tab or return to the server list and reconnect
Memory Setup Fails
- For PostgreSQL, verify the connection string starts with
postgresql://orpostgres:// - Verify that Node.js is installed on the server (it is usually installed automatically)
- Verify that sudo can be run without a password
Character Storage
Character definitions are stored on your iPhone (in-app storage). When switching devices, restore from an iPhone backup.